Make this birch plywood and acrylic light, which carves in under one hour. The coral piece in the center can even be swapped out for other designs.
| Material | Description | Price | ||
|---|---|---|---|---|

|
Baltic Birch Plywood (×2) |
8" × 12" × 1/4" Baltic Birch Plywood |
||
|
|
Baltic Birch Plywood |
8" × 12" × 1/2" Baltic Birch Plywood |
||

|
Black Expanded PVC Sheet |
8" × 12" × 1/4" Black Expanded PVC Sheet (Do not use) |
||

|
Carbide Tip Straight 2 Flute - 1/8 in Cutting x 1/8 in Shank |
Quantity: 1, Shank Diameter: 1/8 in, Cutting Diameter: 1/8 in |
$5.99 |
|

|
Clear Acrylic Sheet - Cast |
Dimensions: 8 in × 12 in, Thickness: 1/4 in, Material Type: Cast |
$5.99 |
|

|
Flexible LED Strip - Warm White |
|||

|
Solid Carbide Downcut Fish Tail Spiral Bit |
1/8" Downcut Fish Tail Carving Bit |
$10.99 |
|

|
Solid Carbide Upcut Fish Tail Spiral Bits |
1/16" Upcut Fish Tail Carving Bit |
$6.49 |
|
|
|
Solid Carbide Upcut Fish Tail Spiral Bits |
1/8" Upcut Fish Tail Carving Bit |
$8.49 |
|
| This project's Bill of Materials is not complete. Add to Cart |
$37.95 |
|||
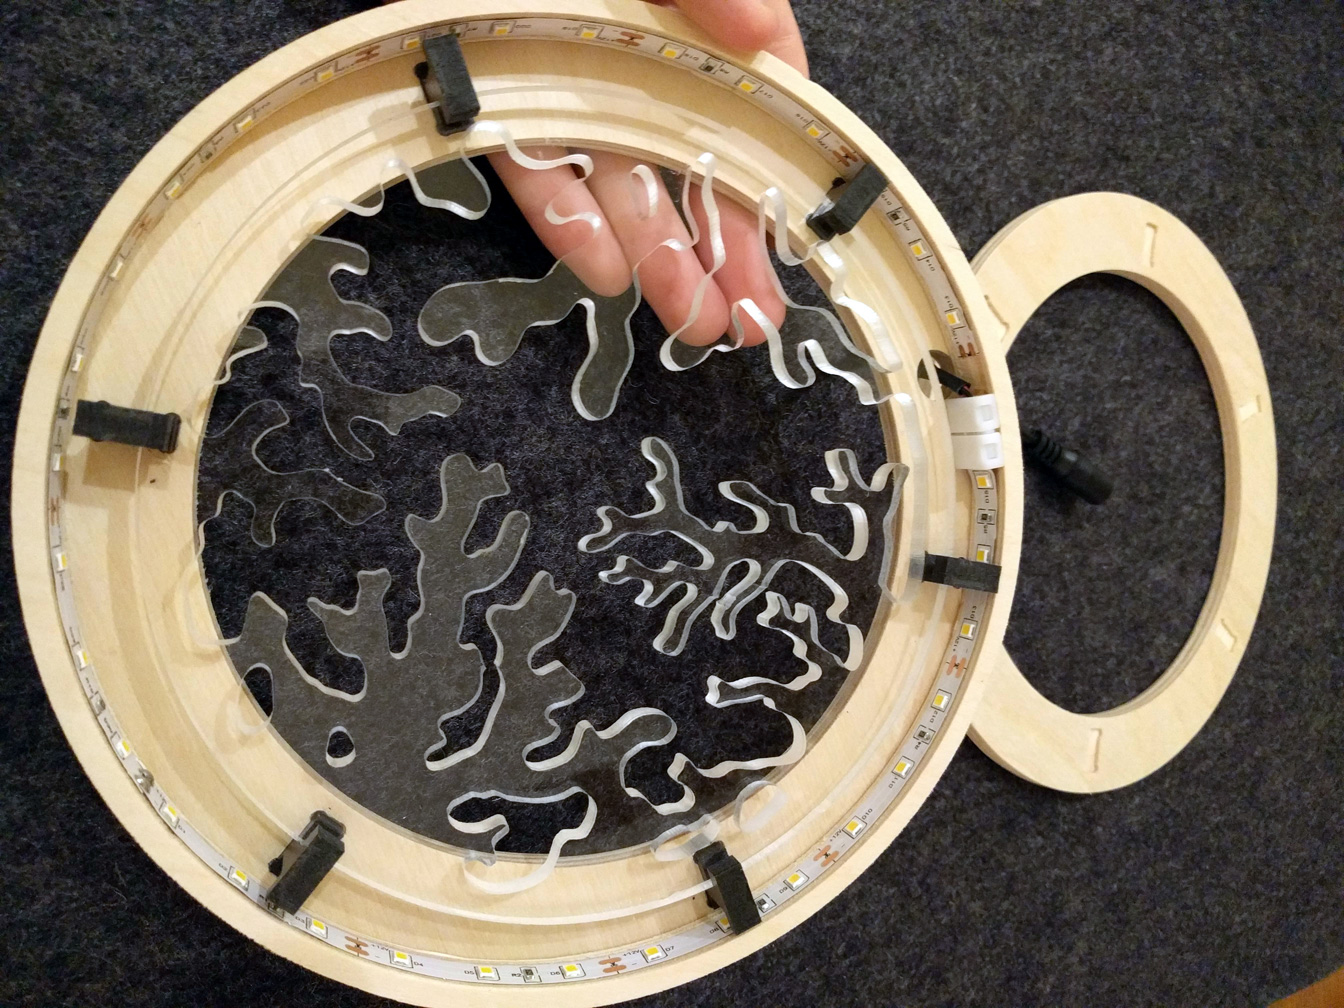
The coral ring light is made from five different carved designs, plus a flexible LED strip. LEDs, which will be affixed to the inner ring, will light the central acrylic piece from the edge, causing it to glow along the cut surfaces. The acrylic piece will be held in place and away from the LEDs by six identical standoffs/clips. These standoffs should fit snugly into notches on both the back and front ring pieces; with the right tolerances, you may only need to glue the edge of the inner ring to the front or back piece, and the other side can be snapped into place with the standoffs. This would also allow you to change out the inner acrylic piece if desired.
49 minutes
Material: 1/4" black expanded PVC sheet
Bit: 1/16" upcut fish tail bit
Workpiece: “Standoffs”
Note: You may wish to use double-stick tape to affix the PVC sheet to the waste board, in addition to clamps. As it is a light material, the upcut bill may pull on the PVC as it carves.
These pieces should fit snugly within the notches that will be carved into the front and back rings, as well as grip the edge of the acrylic. If you look at the pieces as they are oriented in the workpiece, the top and bottoms will fit into the ring notches; the left side indentations will ultimately face towards the center of the light and hold the acrylic; and the right side will face the outer ring piece and provide clearance for the LEDs.
Material: 1/4" baltic birch ply
Bit: 1/8" downcut fish tail bit
Workpiece: Outer ring, front
Clamp the wood to the waste board with the side of the wood that you wish to ultimately be visible facing down. Six notches carved into the wood will accept the standoffs/clips that will hold the central piece of acrylic in place when fully assembled. The notches are sized so the length is equal to the length of the standoffs and the width is equal to the thickness of the PVC sheet from which the standoffs are cut (taking into account cutting tolerances).
Material: 1/4" baltic birch ply
Bit: 1/8" downcut fish tail bit
Workpiece: “Outer ring, back”
This design is essentially the same as the front ring, but it has a hole for the LED cord. You may need to resize this if you are using different lights.
Material: 1/2" baltic birch ply
Bit: 1/8" straight, 2 flute bit
Workpiece: “Inner ring”
The only part we will need for the light is the piece between the two cut lines.
Material: 1/4" clear cast acrylic
Bit: 1/8" upcut fish tail bit
Workpiece: “Coral”
You can also keep the outer diameter of the circle the same size and create a new design to swap in for a less coral-y occasion.
Cut off the tabs and sand the edges of each piece clean.
(Sorry, the picture below shows the pieces with the LED strip already attached. I got a little too eager!)

Attach the LEDs.
The inner diameter of the inner ring is 7.125", so you’ll need to cut about 2 feet of the flexible LED strip. Peeling off the backing as you go, stick the LEDs all the way around the inner circumference of the thick, inner ring.
Optional: finish or coat the wood.
Glue the inner ring to either the front or back outer ring.
It doesn’t really matter which you choose, as long as you make sure the notch side is facing towards the inner ring. If you decide to glue the back ring, ensure that the hole for the LED cord lines up properly and thread the cord through.
Install the acrylic.
Fit the PVC standoffs, evenly spaced, around the outer edge of the acrylic. They should fit pretty snugly, but with enough give that they can be shifted to line up with the notches in the inner and outer rings.
Align the standoffs and press them into the notches on the piece you glued to the inner ring. If the fit is perfect, you’ll get to hear and feel a satisfying snap as they pop into place.
Lower the remaining outer ring into place, notch-side-down. Line up the notches with the standoffs, then snap it together.
Enjoy!